Halloween treats - peanut butter chocolate cookies

As a kid with a serious sweet tooth, spilling out candy I scored from my plastic jack-o-lantern pail, after trick or treating rank up there with some of my best childhood memories. The vision of digging through the treats I had been given, separating them into piles of good, better, and best candy (as well as wrapped and unwrapped for those of us that remember the razor blade scare) are crystal clear. For some reason, mini Reese's peanut butter cups is synonymous with those Halloween memories, always being a kind of candy that I was psyched to find, not to mention for that great vampire commercial they played around Halloween that I could never get out of my mind. I started thinking about treats to make for Halloween this year, and decided I would try to recreate a peanut butter cup in a cookie.

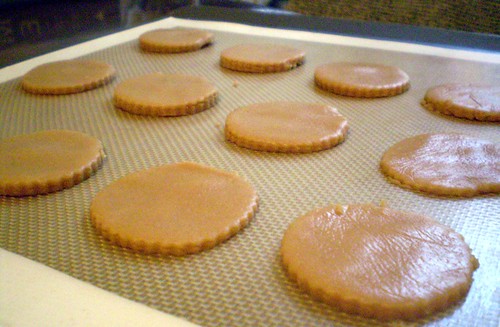
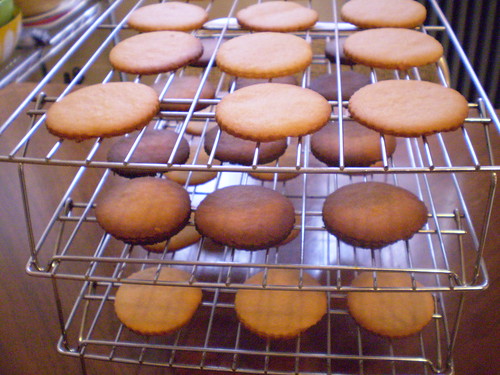
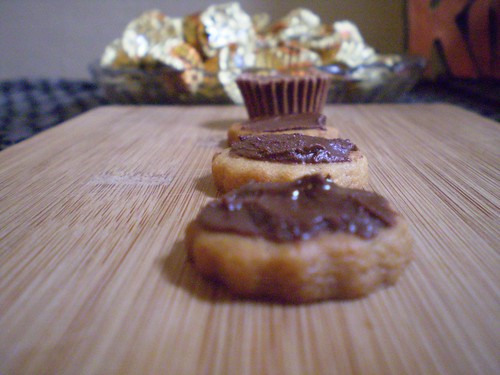
Truth be told, I don't mind peanut butter cookies, but I don't really love them either. Not the way some people do. I have made them in the past, but I really only love peanut butter when it's mixed with something else - jam, bananas, and of course chocolate. This cookie was a no brain-er. I started thinking that all candy bars, should have a cookie counterpart. The dough for this cookie, came from my best peanut butter cookie recipe, which I found in the Home Restaurant cookbook. It's basically one of the best American comfort foods cookbooks I have. These cookies were meant to be a drop cookie, meaning take spoonfuls of the dough and drop it onto the cookie sheet, like you do with chocolate chip cookies. Since I had decided to try and cut these little babies out into their candy counterpart's shape, I had to chill the dough for a bit first, in order to be able to roll it out. This dough is soft and a bit sticky. I found that 30 minutes in the fridge was not enough, but 15 minutes in the freezer after that helped. I also strongly suggest rolling it out between pieces of cling wrap, to minimize the sticky problem too (not to mention, minimizing clean up). They baked up thin and crisp. Exactly the way I wanted them. If you want them a bit denser or softer, I would just not roll them too thin before cutting. Unfortunately, their edges weren't as sharp after baking. Also, unfortunately I over baked a batch, as you can see below, while I was on twitter wishing everyone a happy Halloween. Yes, I am dressed as a big dork this year, thanks for noticing. After letting them cool, and taking a test cookie, or three, it's time to coat with chocolate. It's your call really, if you want to dip them and completely coat them with the chocolate, or just smear the top with it. Either way, they have to go into the refrigerator afterwards to help the chocolate dry a bit. The mini-sized cookies were my favorite, completely addictive as one-bite cookies. The situation quickly became a throw-back to those days when as a kid you'd lose count of all those miniature candies you'd eaten. They just go so fast. Good thing there's no one here to tell me to slow down before I get a stomach ache.
Peanut butter chocolate cookies Adapted from the Home Restaurant Cookbook.

1 1/2 cups all-purpose flour 1/2 teaspoon baking powder 1/2 teaspoon sea salt 1 stick (8 tablespoons) of unsalted butter 1/2 cup sugar 1/2 brown sugar 1/2 cup smooth peanut butter 1 egg 1 tablespoon vanilla 1 1lb. semisweet chocolate, melted

Preheat the oven to 375 degrees Fahrenheit.

Mix the flour, baking powder and salt in a small bowl. Set aside.

With an electric mixer, cream butter with the two sugars, and the peanut butter for 3 minutes. Add the egg and the vanilla, beating for another minute.

Slowly add the flour mixture on low speed, and beat until all is incorporated. If dough seems to be clumping. Mix the rest by hand till all the flour is incorporated. Flatten dough into a disk and wrap with plastic wrap and chill for 1 hour, or 30 minutes plus another 30 minutes in the freezer.

Roll out dough between two sheets of plastic wrap until 1/4 of an inch thick. Cut out shapes and bake for about 9-11 minutes, or until golden brown around edges.

Cool cookies on a rack, and once they are ready dip or spear top with melted chocolate.

Gingerbread Cookie Decorating Party

PC130198.JPGI love gingerbread. It is a holiday classic. It may not be inventive or cutting-edge, but not everything should be. The recipe I follow came from Bon Appetit's December 2006 issue. It is slightly spicy, with a deep brown-sugar and molasses flavor. It puts a twist on tradition by suggesting you flavor your icing with juniper berries. This part I could take or leave. I know there are a million and one gingerbread recipes out there, and every year I say I'm going to experiment with others, but for the last three years all those who have tried them seem to love them so that I haven't found a reason to mess with a good thing. I wanted to share this recipe with you in case your looking for a well-tested classic version. PC130180.JPG I normally make these cookies at least twice during the holiday season. The first batch always seems to disappear before being wrapped up and gifted out to friends and family. The only changes I've made to the original recipe are switching out light brown sugar for dark, and using unsulphured blackstrap molasses in place of regular. It's a subtle change that make for a more intense cookie. It is the perfect cookie to practice your decorating skills on (and I learned I could use a LOT more practice) and make into a snowy weekend project. This batch was made after a wonderful holiday brunch my cousin hosted during Hanukkah. It was too cute to see four people each measuring out different ingredients and generally buzzing around the table. mosaic62cb9d129a8a15fe6a2da6004ae037425bbca69e mosaic05fb6e7b331d4d03440f57c3877176aaa71cd18b After the dough rested, we set up two separate rolling stations (photos at this point were getting a bit blurry after a few mimosas) and went to work lining up the cut out shapes on silpat or parchment-lined baking sheets. This would be perfect work for little kids, but the only kid we had on hand was still too little to help. Not that any of us big kids seemed to mind handling the task. These cookies bake up crisp, and the thinner you roll them out the crisper they will be. We went with about 1/4 inch thickness on the dough to have them be a bit more chewy. They also need to be carefully watched towards the end of the baking time, unless you don't mind them a bit well-done around the edges (I save those imperfect ones for myself). PC130194.JPG Once they're baked, let them cool and prepare the royal icing to decorate as you wish. That's when the real fun comes in. This time around we skipped the juniper flavor used in the original recipe (of course if you want to give the juniper a try, find it here). We used lime juice in place of lemon juice for the royal icing, simply because we were out of lemons. But we all agreed the lime was a nice little twist that we would make again. We used Martha Stewart's royal icing recipe, and it was a very good thing.

Gingerbread Cookies Adapted from Bon Appetit. See links above for two different icing options.

2 1/4 cups unbleached all purpose flour 1 teaspoon ground ginger 1 teaspoon ground allspice 1/2 teaspoon ground cinnamon 1/2 teaspoon baking soda 1/2 teaspoon salt 1 cup (2 sticks) unsalted butter, room temperature 1/2 cup (packed) dark brown sugar 1/4 cup blackstrap molasses

Whisk first 6 ingredients in medium bowl. Beat butter and sugar in large bowl until fluffy. Beat in molasses. Beat in dry ingredients. Gather dough; divide into 4 pieces. Shape into disks. Wrap; chill at least 2 hours and up to 2 days.

Preheat oven to 350°F. Line 2 baking sheets with parchment. Roll out 1 dough disk to 1/8-inch thickness. Using 3 1/2-inch cutter, cut out cookies. Transfer to sheet. Gather scraps; chill.

Bake cookies until almost firm in center, 12 minutes. Cool on sheets 2 minutes, then cool on racks. Repeat, using all dough.

Note: Cookies can be stored in an airtight container at room temperature up to 3 days or freeze up to 2 weeks.

Holiday Lace Cookies

PC160250.JPG You know these cookies. You've seen them in the cookies by the pound section of the bakery case. You've even eaten them before and loved them, most likely without knowing their name. They're an old-fashioned cookie, generally known as Lace Cookies because of their porous looking appearance. It appears there are lace cookie variations from one European country to another (like most cookies). French lace cookies were traditionally made with almonds, while Irish lace cookies were made with oatmeal and milk or cream, and German lace cookies are also oatmeal-based cookies, but with ginger, cloves and cinnamon added. My recipe came from the Fannie Farmer Cookbook, originally written to help bring some consistency to our young country, by creating recipes that were formulas. Fannie (as I like to call her) Americanized things in the process by removing any country of origin, and simply called them Lace Cookies. Additionally, many newer American versions today call for corn syrup, but I prefer to bake with butter when I can.

PC160213.JPG

I'm entering this into the Share Our Strength, 12 Days of Sharing cookie jar. (A great cause, read more about it at In Jennie's Kitchen).This cookie recipe should be categorized under, Stupidly Simple, because it is. Mix dry ingredients in a bowl. Pour melted butter over it, then a beaten egg and some vanilla. Drop onto a cookie sheet and bake. Nothing more too it. It's the kind of recipe you'd be well-served committing to memory to whip up off the top of your head while visiting family, or away for the weekend skiing. The results would impress your onlookers and fool everyone into thinking your a culinary whiz in the kitchen. Sit back, smile, and think, "Ha, ha."

There's only a few tricks to know how to pull this recipe off without a hitch. First, you must must space the cookies at least 1 1/2 inches to 2 inches apart, depending on the size of your cookies. Second, you should stay close to the oven while these babies are baking. They go from well-done to slightly burnt quickly. My suggestion is to keep the oven light on (if you have one) and keep an eye on them after they've been in there for 3 minutes. Plus, it's fun to watch the cookies bubble away and bake. Third, you really must use some patience and give them a few minutes to cool before you try to move them off the cookie sheet. If you slide your spatula under one while it is still hot it will squish into the middle and resemble a piece of caramel. That is an irreversible error. Obviously it will still taste good, but baked goods should also look good too.

mosaic12198e095cd8ebebc96159ac667b67bc5cd6a1fe

mosaice19e9f8404f44b4fbc21594743037eefd1237261

This being a holiday cookie, you should consider some options to gussy up your cookie creation. Consider shaping the cookies into a tuille by bending them around the handle of a wooden spoon while still warm (not hot). Then let them cool in that shape. This is a pretty example of how a tuille shape makes a more impressive presentation. My personal favorite is the way I had them as a kid, where the bottom is coated with melted chocolate. Yum. And, coating things with chocolate seems like a good task to include the kiddies in on. (Personally, I wish someone had let me do that as a kid, rather than play with a dreidel. I'm just saying.)

PC160245.JPG

Holiday Lace Cookies Adapted from The Fannie Farmer Cookbook

1 1/2 cups uncooked oatmeal (not anything instant or quick-cooking) 1 1/4 cups brown sugar 2 tablespoons flour 1/2 teaspoon salt 2/3 cup (about 10 tablespoons) melted butter 1 egg, lightly beaten 1/2 teaspoon vanilla

Preheat the oven to 350 degrees Fahrenheit.

Mix the dry ingredients together in a big bowl. Melt the butter. Add to the dry ingredients and mix to combine. Add the egg and the vanilla and mix until all incorporated.

Line a baking sheet with a silpat or parchment paper. Drop cookies about 1/2-1 teaspoon at a time onto cooking sheet. Take care to keep them spaced about 2 inches apart. They will look small but will spread as they bake. Bake in the oven for 5 minutes or until firm. Watch them closely after 3 minutes, depending on how well done you want them. Let cookies cool on the baking sheet for a few minutes before you touch them. Carefully, using a spatula lift off baking sheet to cool completely.

12DaysCookies_badge-1

Easy-as-a-Summer-Day Cape Cod Cookies

It's a gorgeous summer weekend, the kind that really makes me wish I had a summer house (or more friends with summer houses). It's the type of weather that makes you wish you had planned a bit better in the winter to have some time set aside for a roadtrip to places that seem made for summer. Cape Cod is one of those special places, and it seems appropo that the cookies I made this week were inspired by its simple pleasures. These are the easiest, tastiest oatmeal cookies I know of. I baked these for my bi-monthly Dessert Corp contribution. (For more on Dessert Corp, see my earlier post on this great organization). They are the epitome of an easy dessert - no creaming the butter and sugar, and no special equipment is needed. Just you, your wooden spoon, and a big bowl.

This recipe comes from the Fannie Farmer Cookbook. This book has been sort of a cooking bible in my family. I have learned so much from this book, and still refer to it at times for information (although the Internet has been winning out lately - shhh!). These days I mostly use it for the baking recipes, as my culinary tastes have gotten a bit more exotic, but it is still an amazing reference book. Marion Cunningham included not 1, but 3 separate oatmeal cookie recipes in this book. I chose her Cape Cod version, only because the other recipe called for shortening, which is something I don't keep around and don't prefer to bake with.

I can tell you these cookies won't disappoint. They deliver a deeper, richer flavor than most oatmeal cookies I've tried, thanks to the addition of molasses. They are sweet and spicy, and warm and soft, the way the fresh-baked cookies of my dreams are. They are exactly the kind of cookie I imagine some storybook mom would serve up with a glass of milk to her kids after-school. Although, the feeling is just as nice for us grown-up kids when you bake a batch for yourself.

Easy-as-a-Summer-Day Cape Cod Cookies Adapted from The Fannie Farmer Cookbook. (These cookies work great frozen, so if you don't want to eat the whole batch, just spoon them out onto a cookie sheet, but instead of baking, place in the freezer until frozen, about an hour, and then store in a freezer-safe plastic bag. When ready to use, you can place them directly into the oven from the freezer, just increase the cooking time by 5 minutes.)

1 1/2 cups all-purpose flour 1/2 teaspoon baking soda 1 teaspoon cinammon 1/2 teaspoon salt 1 egg, lightly beaten 1 cup sugar 1/2 cup melted butter 1 tablespoon molasses (I use Blackstrap Molasses, which has a sweeter flavor than regular, if you can find it) 1/4 cup milk (reduced fat works in a pinch) 1 3/4 cup oatmeal 1/2 raisins (optional, dried cranberries would be nice too) 1/2 cup chopped nuts (optional)

Preheat oven to 350 degrees Fahrenheit. Whisk the flour, baking soda, cinammon, and salt together in a large bowl. Add the rest of the ingredients all at once (it'll work, don't worry) and stir together until everything is evenly incorporated.

Drop teaspoon sized cookies on a baking sheet. You may want to press them down a bit with the back of your spoon, as this batter doesn't spread much. Bake until edges look brown and cookies don't appear too gooey, about 10-12 minutes. Cool on a wire rack.