Halloween treats - peanut butter chocolate cookies
 As a kid with a serious sweet tooth, spilling out candy I scored from my plastic jack-o-lantern pail, after trick or treating rank up there with some of my best childhood memories. The vision of digging through the treats I had been given, separating them into piles of good, better, and best candy (as well as wrapped and unwrapped for those of us that remember the razor blade scare) are crystal clear. For some reason, mini Reese's peanut butter cups is synonymous with those Halloween memories, always being a kind of candy that I was psyched to find, not to mention for that great vampire commercial they played around Halloween that I could never get out of my mind. I started thinking about treats to make for Halloween this year, and decided I would try to recreate a peanut butter cup in a cookie.
 Truth be told, I don't mind peanut butter cookies, but I don't really love them either. Not the way some people do. I have made them in the past, but I really only love peanut butter when it's mixed with something else - jam, bananas, and of course chocolate. This cookie was a no brain-er. I started thinking that all candy bars, should have a cookie counterpart.
 The dough for this cookie, came from my best peanut butter cookie recipe, which I found in the Home Restaurant cookbook. It's basically one of the best American comfort foods cookbooks I have. These cookies were meant to be a drop cookie, meaning take spoonfuls of the dough and drop it onto the cookie sheet, like you do with chocolate chip cookies. Since I had decided to try and cut these little babies out into their candy counterpart's shape, I had to chill the dough for a bit first, in order to be able to roll it out. This dough is soft and a bit sticky. I found that 30 minutes in the fridge was not enough, but 15 minutes in the freezer after that helped. I also strongly suggest rolling it out between pieces of cling wrap, to minimize the sticky problem too (not to mention, minimizing clean up).
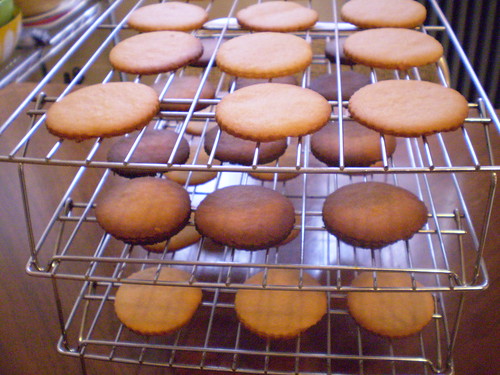
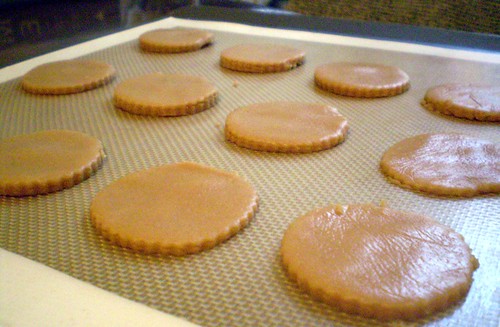 They baked up thin and crisp. Exactly the way I wanted them. If you want them a bit denser or softer, I would just not roll them too thin before cutting. Unfortunately, their edges weren't as sharp after baking. Also, unfortunately I over baked a batch, as you can see below, while I was on twitter wishing everyone a happy Halloween. Yes, I am dressed as a big dork this year, thanks for noticing.
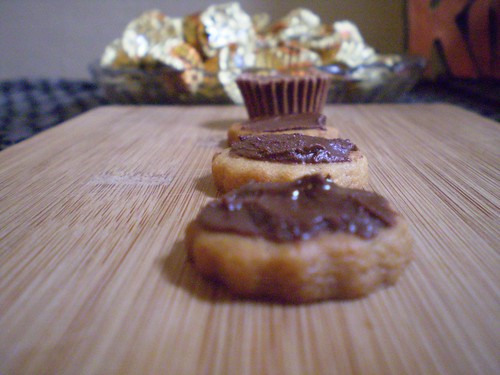
 After letting them cool, and taking a test cookie, or three, it's time to coat with chocolate. It's your call really, if you want to dip them and completely coat them with the chocolate, or just smear the top with it. Either way, they have to go into the refrigerator afterwards to help the chocolate dry a bit. The mini-sized cookies were my favorite, completely addictive as one-bite cookies. The situation quickly became a throw-back to those days when as a kid you'd lose count of all those miniature candies you'd eaten. They just go so fast. Good thing there's no one here to tell me to slow down before I get a stomach ache.
Peanut butter chocolate cookies Adapted from the Home Restaurant Cookbook.
1 1/2 cups all-purpose flour 1/2 teaspoon baking powder 1/2 teaspoon sea salt 1 stick (8 tablespoons) of unsalted butter 1/2 cup sugar 1/2 brown sugar 1/2 cup smooth peanut butter 1 egg 1 tablespoon vanilla 1 1lb. semisweet chocolate, melted
Preheat the oven to 375 degrees Fahrenheit.
Mix the flour, baking powder and salt in a small bowl. Set aside.
With an electric mixer, cream butter with the two sugars, and the peanut butter for 3 minutes. Add the egg and the vanilla, beating for another minute.
Slowly add the flour mixture on low speed, and beat until all is incorporated. If dough seems to be clumping. Mix the rest by hand till all the flour is incorporated. Flatten dough into a disk and wrap with plastic wrap and chill for 1 hour, or 30 minutes plus another 30 minutes in the freezer.
Roll out dough between two sheets of plastic wrap until 1/4 of an inch thick. Cut out shapes and bake for about 9-11 minutes, or until golden brown around edges.
Cool cookies on a rack, and once they are ready dip or spear top with melted chocolate.