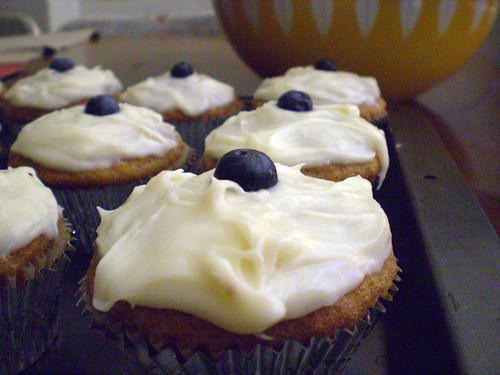
Valentine's day - Red velvet cupcakes

Valentine's day came and went once more without that fancy box of chocolates. I'm not complaining. It maybe worth noting I like chocolate more than anyone else I know, and somehow the only time I've ever received chocolates on Valentine's Day, I had to specifically request them. I think the words were, "you better not come home without a box of chocolates this year". I could be bitter, but I'm not. Instead, I've found the next best solution. I bake whatever I think feels festive to celebrate the holiday, and than go buy myself my own chocolates post-Valentine's Day for half-off.

I understand that men who don't eat chocolate may not know where to go. I do, really. I'm older and wiser now, and have accepted that some men just can't manage to google "top chocolate stores in nyc" to find an answer in less than 30 seconds. It would be unrealistic to expect them to try and research it. I realized I was setting myself up for disappointment because I assumed guys understand that most women wouldn't walk into a chocolate store and buy themselves a box of truffles without a reason, at least from March through January. It seems guys have been pre-programmed to think that flowers from the corner store is sufficient. And, it is. Especially, if you agree that women of NYC need to lower their (my) expectations, as the writer of this Village Voice article suggests to find love. Truthfully, I'm happy that I get anything at all, because it is the thought that counts. That, and it beats the year I got stood up by another single girlfriend.

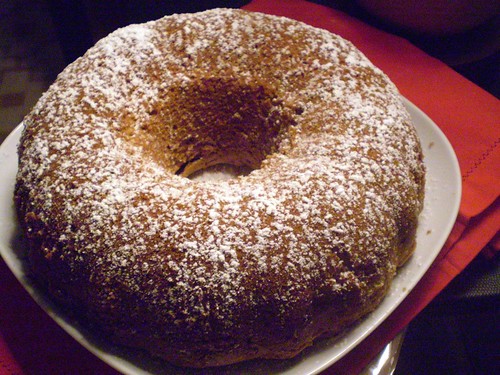
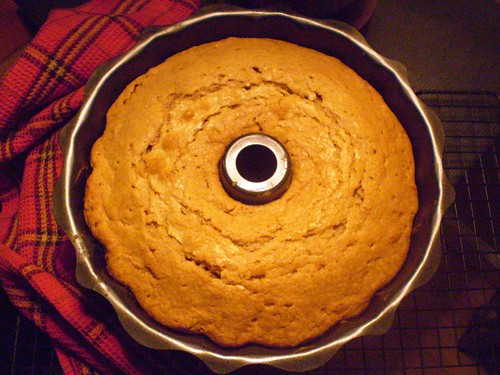
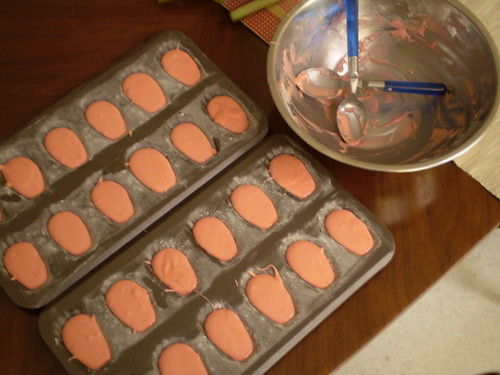
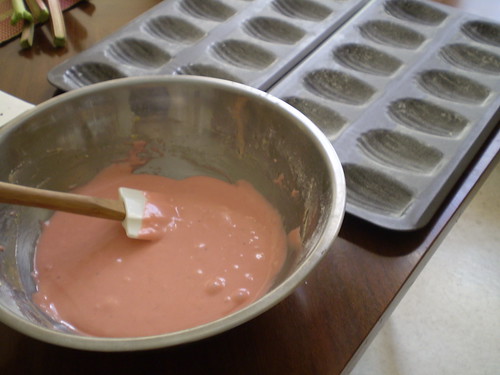
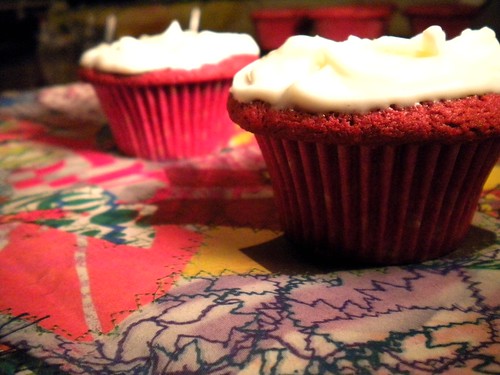
Actually this year, I spent a very fulfilling night on Valentine's Eve, and the next morning (get your mind out of the gutter), baking my festive treat of choice, red velvet cupcakes. It's the kind of sweet you need a reason to bake, and this seemed like the holiday for something red and decadent. I have to admit that watching the batter swirl around in the mixer till it turns a deep red is almost more fun that eating it. Every time I've made a batch, the color seems so vibrant and bright, but then it turns a bit more muted once baked. Next time, I'm really going to up the red so that the color of the finished product is every bit as bright as the pre-baked version. I'm aiming for a color similar to the one Pinch My Salt's version achieves with a whopping two bottles of red food coloring! I used a tablespoon which seems very skimpy in comparison.

A note about authenticity - there are many schools of thought on what makes a true red velvet cake, and being Southern in origin, of course there are some strong opinions on what is needed in the recipe. In case you missed it, Nicole Taylor, who's the fabulous host of Hot Grease on Heritage Radio Network, recently discussed the key ingredients to a true Southern red velvet. (The essentials are highlighted in this article by Brooklyn Food activist Adriana Velez). I wish I had found it before I set out to make mine this year. Although, this version is close enough to authentic to please, but not so exact that a good Southern cook wouldn't find room for improvement. Come to think of it, that's the way I like my Valentine's to be, thoughtful and sweet, but not so perfect that it ruins the excitement for the coming year. I'll always hope maybe next year there will be chocolate.

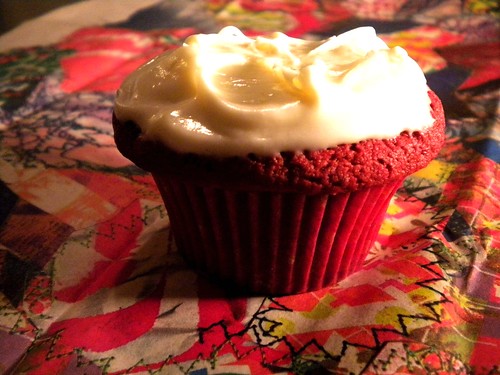
Red Velvet Cupcakes Cream cheese frosting is essential on these.

1 3/4 cup flour 2 1/4 teaspoon baking powder pinch of salt 1/8 cup cocoa powder 1 1/2 cup sugar 3/4 cup unsalted butter, softened 2 eggs 1 tablespoon red food coloring (add more for a brighter color) 1 teaspoon vanilla 1 cup buttermilk 1 teaspoon white vinegar 1/4 teaspoon baking soda Cream cheese frosting to top (your favorite recipe)

Preheat the oven to 350 degrees Fahrenheit. Line muffin tins with paper liners (makes approx. 18 cupcakes).

Sift flour, baking powder, pinch of salt and cocoa. Set aside.

Using an electric mixer or stand mixer, beat sugar and butter until smooth. Beat in eggs, one at a time, then food coloring, then vanilla. Mix in dry ingredients in 3 batches, alternating with 2/3 cup buttermilk in 2 additions.

Make a well in center, pour remaining 1/3 cup buttermilk, vinegar and baking soda in center. When you see little bubbles, stir into the batter.

Pour batter into muffin tins and bake about 20 minutes. Cool 10 minutes and then transfer to a rack to cool completely before frosting.

Spekkoek means "spice cake you should eat this holiday" in Dutch

As you leave for your holiday vacations, and make a mental list of all the goodies you might bake for a big Christmas feast, or to give out to friends and neighbors, I suggest you make room for spice cake on your list. It's better than fruitcake, it's less work than cookies, and it smells more festive than a pine-tree scented candle that someone re-gifted to you. You can even get fancy with it and bake it in lots of different layers, if you are so inclined, as the original version of this Dutch by way of Indonesia cake is sometimes made. You can make mini-ones for easy gifting, or pour the whole batter into a bundt pan, as I did, and than go do something else, like watch It's a Wonderful Life for the twentieth time.

Traditionally baked in many, many, layers it is often visually impressive. Click here and here for examples of how cool it can look if you want to spend the time. But, the thousand layer presentation is not my reason for posting this cake for you, it's simply the ease of it compared to the countless hours that you can spend decorating holiday cookies. If you're feelings time-pressured, or you happen to be short decorating elves, as I am, this might be a good alternative to the usual cookie sweatshop that I turned my kitchen into last year. Don't get me wrong, I loooove holiday cookie baking, and as I write this I'm still considering how many types I will eventually end of baking. But, this year, for my initial baking tasks, I went with a cake, after a conversation with a friend about what a time-savor it could be. Most importantly, spice cake belongs at the holidays. It's got that holiday smell of cinnamon and nutmeg, and it's not too too sweet for those scrooge types who don't appreciate sweets. I found this recipe a few years back on Leite's Culinaria and have made it once a year every year since because everyone who tastes it seems to approve heartily. It has a perfect light texture, and really could be made in a tube pan, a more decorative bundt pan, or mini loaf pans. I hope you give it a try, and I hope you have a wonderful holiday filled with all matters of sweet things.

photo.jpg

Spekkoek Adapted from James Oseland, Cradle of Flavor. If you choose to make it in mini-loaf pans, I'd adjust the baking time to 30-40 minutes depending on your oven, checking it at the 30 minute mark.

2 cups sifted cake flour (or 2 cups minus 4 Tbsp of all-purpose flour) 1/2 teaspoon baking powder 1 teaspoon grated nutmeg 1/2 teaspoon ground cloves or allspice (depending on your taste preferences) 4 teaspoons cinnamon Pinch of salt 1 1/2 cup butter (at room temperature) 1 2/3 cup sugar 4 eggs (room temperature) 3 egg yolks 2 teaspoons vanilla Powdered sugar to decorate

Take your butter and eggs out and let them come to room temperature. Preheat oven to 325 degrees Fahrenheit and grease and flour a bundt pan (unless you have a non-stick one).

Sift the flour, baking powder, spices (nutmeg - cinnamon) and salt. Sift twice.

With an electric mixer cream the butter until very soft, then slowly add sugar. Beat on high for 5 minutes until mixture is pale and fluffy. Add eggs, one at a time and beat for another 2 minutes. Add flour mixture in 3 parts beating on low until well incorporated. Add eggs yolks and vanilla. Mix until combined.

Pour cake into bundt pan and bake for 45 minutes to an hour. To make sure it's done, test to make sure toothpick comes out clean from thick part of the cake.

Let cake cool in the pan on a rack for 10 minutes before flipping out of the pan onto a plate. Let cool completely and then dust the top with powdered sugar.

Thanksgiving - Pear Pie with a Gruyere Crumble topping

picnikfile_DZa1JN Thanksgiving for me is about comfort food and sticking with tradition, maybe throwing in a new twist here and there to keep it interesting. I didn't cook Thanksgiving this year, and in fact, except for one year, I have never been responsible for hosting the holiday. Generally, I volunteer to bring a dessert, since I feel like dessert should always be homemade on Thanksgiving. I've eaten my fair share of grocery-store bought pie, and it just doesn't cut it. I started making pumpkin pie around 17 years old, and that's always a staple. This Thanksgiving, I made a pie that I first tested last year at a pie contest in Brooklyn that I think I'll be adding to my list of traditions (for the record, I heard it came in the Top 10). It's a pretty simple recipe, with pears and a crumble top mixed with shredded Gruyere cheese, and a dash of Cayenne pepper for some unexpected heat. In my opinion, you'll always need pumpkin pie at the table, but this is a pie you'll always want at the table once you give it a try.

Pear Pie with Gruyere Crumble This recipe is more of a blueprint than a recipe. Vary the types of cheese. vary your spices, or if you want add additional fruit.

For the pie filling: 5-6 pears peeled and sliced (use whatever kind is in season for you) 1 tablespoon lemon juice 1/2 cup brown sugar 3 tablespoons cornstarch 1/2 teaspoons cinnamon 1 Unbaked pie crust

For the crumble topping: 1/2 cup all-purpose flour 1/2 cup brown sugar 2/3 cup shredded Gruyere (+ 1/4 cup for topping, optional) 4 tablespoons butter 1/8 teaspoon cayenne pepper

Preheat oven to 400 degrees Fahrenheit.

Toss sliced pears with lemon juice in a large bowl. Mix in the mixture of brown sugar, cornstarch and cinnamon in a separate bowl, then mix into the pears until evenly coated. Set aside.

Roll out the pie dough (homemade is best), into a 9 inch pie plate. Fill the pie with the pear mixture. Set in refrigerator so pie crust can hold its shape while you prep the crumble. Mix all ingredients in a small bowl, then add the butter in with your fingers, until the mixture resembles coarse crumbs.

Top the pie with the crumble topping and bake for 45 minutes, or until golden brown. If you wish, in the last 15-20 minutes of baking, sprinkle another 1/4 cup of shredded cheese on top so that it can melt. Let cool on a wire rack before serving.

Halloween treats - peanut butter chocolate cookies

As a kid with a serious sweet tooth, spilling out candy I scored from my plastic jack-o-lantern pail, after trick or treating rank up there with some of my best childhood memories. The vision of digging through the treats I had been given, separating them into piles of good, better, and best candy (as well as wrapped and unwrapped for those of us that remember the razor blade scare) are crystal clear. For some reason, mini Reese's peanut butter cups is synonymous with those Halloween memories, always being a kind of candy that I was psyched to find, not to mention for that great vampire commercial they played around Halloween that I could never get out of my mind. I started thinking about treats to make for Halloween this year, and decided I would try to recreate a peanut butter cup in a cookie.

Truth be told, I don't mind peanut butter cookies, but I don't really love them either. Not the way some people do. I have made them in the past, but I really only love peanut butter when it's mixed with something else - jam, bananas, and of course chocolate. This cookie was a no brain-er. I started thinking that all candy bars, should have a cookie counterpart. The dough for this cookie, came from my best peanut butter cookie recipe, which I found in the Home Restaurant cookbook. It's basically one of the best American comfort foods cookbooks I have. These cookies were meant to be a drop cookie, meaning take spoonfuls of the dough and drop it onto the cookie sheet, like you do with chocolate chip cookies. Since I had decided to try and cut these little babies out into their candy counterpart's shape, I had to chill the dough for a bit first, in order to be able to roll it out. This dough is soft and a bit sticky. I found that 30 minutes in the fridge was not enough, but 15 minutes in the freezer after that helped. I also strongly suggest rolling it out between pieces of cling wrap, to minimize the sticky problem too (not to mention, minimizing clean up). They baked up thin and crisp. Exactly the way I wanted them. If you want them a bit denser or softer, I would just not roll them too thin before cutting. Unfortunately, their edges weren't as sharp after baking. Also, unfortunately I over baked a batch, as you can see below, while I was on twitter wishing everyone a happy Halloween. Yes, I am dressed as a big dork this year, thanks for noticing. After letting them cool, and taking a test cookie, or three, it's time to coat with chocolate. It's your call really, if you want to dip them and completely coat them with the chocolate, or just smear the top with it. Either way, they have to go into the refrigerator afterwards to help the chocolate dry a bit. The mini-sized cookies were my favorite, completely addictive as one-bite cookies. The situation quickly became a throw-back to those days when as a kid you'd lose count of all those miniature candies you'd eaten. They just go so fast. Good thing there's no one here to tell me to slow down before I get a stomach ache.

Peanut butter chocolate cookies Adapted from the Home Restaurant Cookbook.

1 1/2 cups all-purpose flour 1/2 teaspoon baking powder 1/2 teaspoon sea salt 1 stick (8 tablespoons) of unsalted butter 1/2 cup sugar 1/2 brown sugar 1/2 cup smooth peanut butter 1 egg 1 tablespoon vanilla 1 1lb. semisweet chocolate, melted

Preheat the oven to 375 degrees Fahrenheit.

Mix the flour, baking powder and salt in a small bowl. Set aside.

With an electric mixer, cream butter with the two sugars, and the peanut butter for 3 minutes. Add the egg and the vanilla, beating for another minute.

Slowly add the flour mixture on low speed, and beat until all is incorporated. If dough seems to be clumping. Mix the rest by hand till all the flour is incorporated. Flatten dough into a disk and wrap with plastic wrap and chill for 1 hour, or 30 minutes plus another 30 minutes in the freezer.

Roll out dough between two sheets of plastic wrap until 1/4 of an inch thick. Cut out shapes and bake for about 9-11 minutes, or until golden brown around edges.

Cool cookies on a rack, and once they are ready dip or spear top with melted chocolate.

Carrot to the cake and my first guest post

I know some people who know some people who write a slamming blog filled with cultural news, cartoons, political discussion, the goings on around Miami, and so much more. I recently contributed a food post, for the best carrot cake recipe I've ever tried. Head over to The Heat Lightning to check out the recipe, hysterical news on The Jersey Shore in Miami, and how I really feel about cupcakes.

Bing Cherry Baklava

P7030261.JPGI'm not sure what to say about cherries. If you're not eating them, you're missing some of the best fruit nature gives us. I eat cherries by the pound as soon as they show up in summer, until they're practically past their prime and rotting in the box on the way home at the end of the season. I've never thought to do anything with them other than snack on them. Although I love cherry pie, cherry strudel, even cherry soup (yes, there is cherry soup) cherries in my kitchen do not last long. This time I wanted to try something new, and last week wanted something festive for the 4th of July. Somehow I suddenly wanted to try making a cherry baklava, even if it's not as quintessentially American as I had in mind, I told myself it could be a great melting pot tribute to the U.S.A. After all, I'd like to think ingenuity is a quality all patriotic people embrace.

I should say that I realize that my use of the word "baklava" is only loosely appropriate here. I have never been to any of the countries where baklava is a mainstay (Greece, Turkey, parts of the Middle East) so maybe things are different there, but in New York City, I have never seen a variation on the classic baklava. So, I hope I don't offend any die-hard baklava fans with this adaptation. That said, I feel that the use of layers of phyllo dough, chopped nuts and honey syrup are enough to allow me to consider this dessert a baklava of sorts. It is filled with pitted and chopped cherries and a bit of sugar (they're so sweet they hardly need much help). It adds a nice flavor to the dish, as so many baklavas are completely overpowered by the honey syrup poured over the top. If you want a stellar recipe for the classic kind, check out this amazing version. As this was my first baklava attempt, I decreased the amount of layers of phyllo between each layer thinking it wouldn't matter and be less about the crust. That was a mistake. As you can see in the photos, it's  a bit too flat. I have adjusted the recipe so that when you try it it will be better thickness. P7020249.JPG Before you worry that you can't make this dessert because you don't have a cherry pitter, neither do I. Since I was chopping the cherries in half, I simply used a small pairing knife and my fingers. It took about ten minutes to pit about a pound of cherries working quickly. Not the end of the world. Alternatively, here's a great rundown on all the different ways to pit a cherry, including using a safety pin. Like I said, perfectly whole cherries are not needed for this recipe though, because phyllo is too delicate to be able to layer around them without a mess. Everything is chopped which adds to the great texture that this dessert has. Its a mix of crunchy chopped pistachio nuts, the soft syrup soaked bottom layer of the phyllo, and the light as air crisp top layer. It's all those things with an added layer of cherry pie filling mixed with ground almonds. Another American virtue, like it or not is excess, and this is definitely an excess of dessert goodness.

Bing Cherry Baklava Adapted from The Olive and the Caper, by Susanna Hoffman. Makes one 9"x13" pan. Can be prepared ahead of time and left out till serving.

1 package of phyllo dough (about 32 sheets), defrosted 1 cup of unsalted butter, melted 1 cup of ground almonds or finely chopped 1 teaspoon of vanilla 1 cup of finely chopped pistachios 1 1/2 bing cherries, pitted and chopped 1/4 cup of sugar 1 Tablespoon cornstarch 1/2 cup of honey heated and mixed with 1/2 cup of water

Preheat the oven to 350 degrees Fahrenheit. Prep ingredients before layering.

Take phyllo dough and lay flat with a sheet of wax paper on top with a damp kitchen towel over that to keep sheets moist. Melt butter. Pit and chop cherries, mix with sugar and cornstarch, and set aside. Mix ground almonds and vanilla. Set aside. Chop pistachios and start to layer the baklava. (Either cut phyllo to fit pan before assembling or you can cheat and do it at the end like me).

Start with 7-8 layers of phyllo at the bottom of a 13"x9" inch pan. Brush melted butter over each layer before laying on the next. Butter the last layer, then spread a third of the almond mix evenly over the pan. Follow that with chopped pistachios. Take cherries and spread them evenly over the almond layer. It will look messy, but don't worry. Place another 8 layers over that, continuing with butter in between each layer. Layer another third of almond mixture and then pistachios. Repeat layers once more, and end with the last 8 phyllo sheets. Brush with butter well.

Using a sharp knife, cut through all the layers hanging over the pan, if you still need to and then cut 15-18 diamond or square shapes. Place in the oven for 20 minutes.

After 20 minutes, take out of the oven and pour any remaining butter over the top and continue to bake for another 20-25 minues until golden and crisp. Remove from the oven and let stand for 5 minutes to cool slightly.

To finish, take the honey syrup and pour around the edges of the dish and in between the cuts. Avoid spilling on top to prevent it from being soggy. Set aside and let cool completely. Sprinkle top with chopped pistachios. Feeds many hungry people or a few greedy ones.

Everyone wins with strawberry cheesecake bites

I did it. I won my first contest. I don't mean to brag or anything, but winning really is sweet. Last Wednesday, I participated in the Best Desserts benefit for The Lamp organization. In the spirit of charity, myself and five other fabulous bloggers turned out an impressive array of desserts for the competition. Esther, took home the audience favorite win with her Jacques Torres inspired chocolate chip cookies, Katy brought mocha brownies, Anna brought amazing bite-sized salted turtle cashew cupcakes, Rachel gave us Asian rice crispy treats and Emily brought chocolate chip cookies covered in a salted butterscotch sauce, yum!

I decided to make strawberry cheesecake bites after being inspired to do something with the incredibly sweet and juicy local strawberries I found at the Greenmarket last week. They blew my mind, nothing like those super-sized ones in the supermarket. These little berries have super-sized flavor and paired with a killer cheesecake, well, it's my idea of a best dessert.

When I set out to come up with my own version of cheesecake, I went to the source of great cheesecake. It's Junior's cheesecake that originated at Junior's Restaurant in downtown Brooklyn. I still remember driving past the restaurant for the first time with Bernie (my grandfather), as he pointed it out to tell me they had great cheesecake. I knew I could trust his opinion on the matter because the only thing Bernie ever points out while driving is all the storefronts that used to be a Jewish delicatessen, well, that and whoever is committing a driving violation. The man really missed his calling as a traffic cop. Back to cheesecake, I'm from New York, and I believe that great cheesecake is New York style cheesecake, like they make at Junior's. You can keep your French or Italian cheesecake with the soft fluffy texture. I want a dense tangy cream cheese overload slice of cheesecake. However, I wanted to make it mine somehow so I tweaked a few things to my liking. Junior's is missing texture. So, I switched out their sponge-cake crust with a graham cracker one. And, I cut down on the sugar a bit knowing that the strawberries are sweet enough. Lastly, I cut out a whole eight ounces of cream cheese for a few reasons. Junior's is almost too dense. It gets stuck to the roof of your mouth like a peanut butter sandwich on white bread. Plus, it was a little trick to cut down on the calorie count (and cost) this way you could eat more of it, and feel less guilty. This is the only way I would attempt to "lighten" a cheesecake recipe. It was a gamble, but I think it worked well.

One more preachy point about the strawberries, this recipe really does benefit from the sweetness of a fresh-in-season strawberry. But, if you're craving it past strawberry season, it's still a cheesecake recipe and it would work with any seasonal fruit. I'm really not ready for strawberry season to end, not one bit. Luckily, summer is just starting, so I guess I'll just have to come up with a "Best Dessert" for each fruit that appears in the market.

Seasonal Strawberry Cheesecake Bites Adapted from Junior's Restaurant Cookbook. Do not attempt this with low-fat cream cheese. Allow these to chill at least 6 hours, or overnight is best.

2 cellophane packs of graham crackers (about 18) 5-6 tablespoons of unsalted butter, melted 3 8 oz. packages of good quality cream cheese, at room temperature 3/4 cup sugar 1/4 cup cornstarch 3/4 teaspoon vanilla 2 eggs 1 cup heavy cream 1/2 cup good quality strawberry jam Pint of fresh local stawberries

Preheat oven to 325 degrees Fahrenheit. Have handy four small muffin size tins. Do not grease or line them.

Make the crust - Break up graham crackers in thirds and place in a food processor. Pulse until they are fine crumbs. May need to break up a few small bits with your hands. Place crumbs in a bowl and combine with melted butter until all the crumbs look wet. Take about a teaspoon of crumbs and put in each muffin slot. Press down with your fingers until flat. Chill the tins in the fridge while you prepare the filling.

Make the filling - Using a stand mixer place one bar or 8 oz of cream cheese in the bowl with the sugar. Mix for about 2 minutes on low speed until sugar is completely incorporated and mixture looks creamy.

Add the cornstarch and mix to combine. Then add the remaining two bars of cream cheese and mix for another 2-3 minutes or until it looks creamy and smooth. Add the vanilla, mix. Add one egg at a time, mixing until it is incorporated into the batter. Last add the cream and allow to mix for about a minute until texture is creamy again, not liquid-y.

Using two tablespoons spoon mixture into the mufffin tins. Once they're all full, take the jam and break it up a bit with a fork so that it is not so chunky. Place about a teaspoon on each cheesecake and using a toothpick or the end of a knife, swirl it into the top of the batter.

Bake cheesecake bites for about 20-25 minutes or until edges look set and middle is only slightly giggly. Let cool on a wire rack to room temperature, then place in the fridge to cool completely.

Top each one with fresh strawberries before serving.

Best Desserts - A Benefit for The LAMP with some fabulous food bloggers and yours truly

I'm baking again, for another great cause. This time it'll be part of a fun-filled benefit to raise money for a great organization, The LAMP, which supports media literacy skills. I'm not sure what I'll be making, but I do know that you'll get to taste all the goodies from myself and the other contestants. And, of course sweets are that much sweeter when you eat them for the sake of charity. I'll see you there!

Click here to buy your tickets in advance.

Madeleines for GrandmaMa's Day

Mother's Day for me is all about "Ma." She's been filling in for missing mothers in my family for more than twenty years now. As the years have gone on, she's taken on even more "children." Being a mother, is what she does best. She never had a professional career, although she would have made a hell of a teacher / bookkeeper / nurse / psychologist / personal assistant. I know because she's been busy playing all of those roles to an impressive amount of "children" consisting of her kids, grand-kids, great-grand-kids, nieces, and neighbors, for all these years. She isn't a grandmother like ones that you always hear about, cooking big meals from scratch of recipes from the old-country (she prefers the ones on the back of the box), or one with tales from a glamorous past from days long ago. She's sweet and simple, unfussy almost to a fault. She's wise and strong, and has only gotten more so with age, but she's also hysterical, and someone who can make you feel instantly comfortable. If she had a culinary equivalent it would be the Madeleine... even if she doesn't know what they are. Madeleines are little tea cakes that you can serve at breakfast, brunch, tea time or dessert. If you are like me and my Ma, you'll think most times are acceptable for a little something sweet. They are well-known as being associated with Marcel Proust's writings on involuntary memory. (More about that here). However, despite their fancy little shapes and associations, they're actually a snap to make, if you get yourself the proper pan. (I normally wouldn't advocate buying a one-trick pony pan, but these little cakes are great for party favors and all sorts of occasions, that I think you'll get a lot of use out of it). The traditional flavoring is a little lemon zest and vanilla. That is how I normally make them. In honor of Ma, I wanted to try to flavor them with strawberry, which turned out very nice too. The jam I used did nothing to change the color of the cake, so I cheated with a bit of pink food coloring. I know, I know, but pink seemed so much more festive. It was only a drop too. If you can find strawberry extract that might eliminate the need for the food coloring. I checked three stores, but I couldn't find it. I think the flavor from using jam is probably preferable anyways.

Bake these and give them out as Mother's Day gifts to friends or family, if you won't be celebrating with your mom. You pretty much can't mess these up, unless you over-bake them, so watch them towards the end. They're a classy choice, making it seem that you went to the extra trouble to think about someone other than yourself. Exactly what the best Mas in the world do naturally.

Strawberry Madeleines Adapted from Bon Appétit.

2 eggs 2/3 cup sugar minus 2 teaspoons 1/2 teaspoon vanilla 2 1/2 tablespoons good quality strawberry jam Couple of drops of pink liquid food coloring (optional) Pinch of salt 1 cup of all-purpose flour 10 tablespoons unsalted butter, melted

Preheat oven to 375 degrees Fahrenheit. Butter and flour madeleine pans well.

Melt butter and set aside to cool. Beat eggs and sugar in a large bowl with an electric mixer till blended. Beat in vanilla, jam, and salt. Beat in food coloring if using till batter is desired color. Add flour and beat until just blended.

Gradually add cooled melted butter to mixture, beating until just blended.

Spoon one tablespoon of batter into each cake shell. Bake until puffed and edges are lightly golden, about 12-15 minutes. Cool in pan for 5 minutes, then remove from the pan and finishing cooling on a wire rack.

A bake sale at the Brooklyn Flea is music to my ears

There have been a lot of fun things that happened since I started this blog, but tomorrow might top them all. Two of my favorite things, baking, and going to the Brooklyn Flea on weekends, are coming together in the name of charity. I'm going to be donating some baked goodies to the Food Bloggers Bake Sale booth at the flea market this weekend, which is part of the national Share Our Strength Bake Sale happening around the country this weekend. All the monies raised go to fight childhood hunger in America. Click here to find a sale in your area this weekend and learn more.

If you're around NYC this weekend, come down to the Brooklyn Flea and buy a treat or three. The list of offerings that some local food bloggers are donating range from the classics to the extremely ambitious. I'll be bringing my lace cookies because they're always a hit, and I'm going to make cheesecake brownie bites, inspired by Smitten Kitchen's gorgeous looking recipe that I've needed an excuse to try. All the info you need to know about the sale, and the bloggers participating (and more importantly, what they'll be baking) is on Jacquie's blog , The JLH Life. And, as an added bonus, yours truly will be at the stand from 3-4pm. Come by and hi, kisses hello are free, but the cookies you have to pay for. Hey, it's for the kids!

What to do with matzoh

March 073.jpg

Newsflash - matzoh covered with caramel and melted chocolate is good. It's stand over the stove and greedily eat half a tray good. The kind of good that you will actually want to eat any time of the year. So why post a recipe for something this basic?  Well, I've seen and tried a fair number of chocolate-covered matzoh in my day, and well, frankly matzoh may be one of the few foods on earth that doesn't improve when covered in chocolate. It's that bland. I always assumed that was because the only good food you could find that was kosher for passover, was food that just didn't involve matzoh in any form. In general, with the exception of matzo-ball soup, I figured Passover was mostly filled with culinary creations meant to make you feel sorry for yourself that this holiday wasn't celebrated with chocolate-shaped bunnies. But, this Sunday, one night before Passover began, a culinary miracle was being prepared in my friend Shana's kitchen. Chocolate-caramel-covered matzoh that actually made me think, if it's possible to make matzoh taste good, it's possible Moses parted the Red Sea (for a brilliant illustration of this Biblical story click here).

Matzoh, the unleavened, cracker-like bread product that Jewish people eat in place of bread during the holiday of Passover (hey?! some people might not know) while, pleasantly crunchy, has the flavor profile of food you eat while getting over a stomach virus. So, when I sat down to think about my favorite Passover dessert foods, I didn't get very far. I am a strong believer that the desserts that are flour-free by choice are the best bet for this holiday, flour-less chocolate cake, flans, and nut-based cookies and cakes. But, those aren't always the simplest to make and in the interest of time (no one really gets off from work for this holiday) and as a great idea to make with any kids that may be around, I thought I'd post this recipe, along with some other really really simple Passover dessert options that have managed to win me over in recent years.  Funny enough, all my favorites come from who else, Martha Stewart. And since she improved on Passover desserts, I'd like to propose we make her an honorary member of the tribe, if she wants to accept. Here are some links to her Macaroon recipe (shredded coconut "cookies" that are customary) and a Matzoh Bark recipe, that easily adapts to any tastes and is simple enough to be a pre-school cooking project. Both of these recipes I make without changing a thing, accept how you choose to decorate. MacaroonsMatzoh Bark

This chocolate-caramel matzoh recipe is Martha's as well, and my favorite of the three. And to be honest, you could make it without a single change and be quite content with the results. The combo of the slightly salty caramel with the crunchy texture of the matzoh and almonds is hard to improve on. But having made it a few times already in the past two days (it's completely addictive) I think there are a few tweaks that make it work a bit better and quicker. I shortened the cooking time a bit, and most importantly I wait to break up the matzoh until the very end, which leaves you with less crumbly little pieces. (Although this also leaves less for the cook to snack on). This matzoh will definitely do for you, what no Passover dinner ever managed to do for me, help you forget about the missing basket of tinfoil-wrapped chocolate eggs, if just for a night or two.

Chocolate Caramel Matzoh

Adapted slightly from MarthaStewart.com

  • 4 sheets of matzoh
  • 1 cup of sliced or slivered almonds (or any topping you'd prefer) 
  • 1 stick of butter
  • 1/2 cup of brown sugar
  • 1/2 teaspoon of kosher salt
  • 2 tablespoons of water
  • 1-2 cups of chocolate chips (or any chocolate you have on hand, melted)

Preheat oven to 325 degrees. Line 2 baking sheet with parchment.

Place 2 sheets of matzah on each sheet and scatter almonds evenly on top. Set aside to make the caramel.

In a saucepan, bring butter, sugar, salt, and 2 tablespoons water to a boil over medium, stirring constantly. Working quickly, drizzle over matzohs. Using a heatproof spatula, spread mixture evenly to coat. Bake until golden, about 20-30 minutes. Watch carefully last 10 minutes so it doesn't burn.

Remove from oven; sprinkle with chocolate chips. Let chocolate melt 5 minutes; spread chocolate over matzoh. Don't worry if there are some spots without chocolate. Refrigerate until chocolate has set.

Break into pieces, and serve. (To store, refrigerate in an airtight container).

There is a lot you can learn about love by making pudding

The hopeless romantic in me adores all things associated with Valentine's Day, the chocolates, the flowers, and the forced showing of affection. Actually that last part can't be counted on because as we all learn eventually love is fickle and at times fleeting, what can start out so promising and seem so perfect between two people can end up a complete disaster. This is why we should all be forced to make chocolate pudding before starting to date. I realized the similarities between turbulent relationships and custard as I sat home with the best of intentions making a batch of chocolate pudding the day before Valentine's. Home-made chocolate pudding can be made on the stove top, but there is the custard-based version that needs to bake in a water-bath before cooling. I grew up eating chocolate pudding that was made for me as a special treat. I was allowed to lick the spoon as a consolation prize for having to wait until the little serving bowls chilled. This was the extent of homemade dessert making in my house, and, I loved every minute of it. But, as I learned this Valentine's Day weekend, real pudding is more complicated than a box of My-T-Fine. Making custard, is an undertaking that one must know a little bit about before naively plowing ahead. When treated wrong, there are several things that can ruin a custard as it bakes, resulting not with the velvety smooth pudding of your dreams, but scrambled eggs. chocolate pudding gone wrong I was heartbroken that my pudding, which was as silky as a bowl of melted chocolate when it went into the oven, didn't have a happy ending. I searched frantically to try and find an explanation as to what went wrong. I sat down and stared in disbelief at the curdled mess in the ramekins. I tried to stir them and make them smooth again, but what's done is done. Then I realized (it being Valentine's Eve and all), that my shock at how this didn't go as expected reminded me of certain past relationships. Sometimes you can't just smooth things over. This is a lesson that all girls and boys should learn about love, because getting over a failed custard is a lot easier than a getting over a broken heart. Just the knowledge that pudding made with the best of intentions can morph into something utterly unattractive if things don't go as planned, might remind one to proceed with some caution in matters of the heart, as well as the oven. (I did finally figure it out what caused the disaster when a friend pointed me to Harold McGee's chapter on custard in On Food and Cooking -  now I know for next time, and have adapted the recipe to include the fix).

I say all this not to scare people off from making chocolate pudding (or falling in love). When done right, it's worth the extra effort (and infinitely better than some second-rate option that comes in a little plastic container). Like love, if it works it should feel comfortable, and something that is so pleasurable you're content to sit at home enjoying it, rather than the kind of dessert that needs to be dressed up with fancy swirls of decorative coulis to make you think it's worth your time. No matter how your chocolate pudding turns out, at least you'll have tried. And if it turns out you fail, you'll know more for next time. And, of course, there's always more pudding in the sea.

Chocolate Pudding Adapted from the Recipes from Home Cookbook, by David Page and Barbara Shinn. Do not tightly cover your baking dish with the ramekins or the temperature of the water bath will rise too high and the steam trapped inside the dish will cook the eggs too quickly causing them to curdle.

2 cups heavy cream 2.5-3 ounces best quality bittersweet chocolate (finely chopped) 3 large egg yolks 1/4 cup sugar 1/2 teaspoon vanilla Pinch of salt

Preheat the oven to 325 degrees Fahrenheit. Set out 4 ramekins and a deep baking dish large enough to hold them and a water-bath.

Bring the heavy cream to a simmer in a saucepan and then remove from the heat. Place the chopped chocolate in a stainless steel bowl and pour half of the cream over the chocolate. Let stand until melted. Stir until mixture is completely smooth and then add the other half of the cream.

Whisk egg yolks, sugar, vanilla and salt in a separate bowl. Gradually whisk in the melted chocolate mixture. Strain the pudding through a fine-mesh strainer and skim off froth on the top.

Pour the pudding into 4 small ovenproof (about 6 oz) ramekins. Place them in a deep baking pan and put pan in the oven. Add enough hot water to the pan to reach halfway up the sides of the ramekins. Cover loosely, with tin foil. Make sure there is room for air to escape and ensure that the pan does not trap the steam. Bake for about 50 minutes, or until puddings look set around the edges, but not quite in the center. Give them a shake to tell.

Remove ramekins from the water bath and let cool to room temperature before placing in the refrigerator to cool completely.

Espresso-Maple-Walnut Nanaimo Bars

I did it. I completed my first Daring Bakers Challenge. The January 2010 Daring Bakers’ challenge was hosted by Lauren of Celiac Teen. Lauren chose Gluten-Free Graham Wafers and Nanaimo Bars as the challenge for the month. The sources she based her recipe on are 101 Cookbooks and www.nanaimo.ca. I have never made graham crackers before, and decided to stick with wheat flours for this one being that I'm not gluten-free. These super sweet treats are popular in the Vancouver area, so in honor of the upcoming 2010 Winter Olympic games this was a great recipe to try.  My first surprise was that the non-gluten free graham cracker recipe didn't require graham flour. I, like many others, assumed there must be something complicated involved with making these childhood favorites. Otherwise, why is it so rare to hear about homemade versions? After trying this recipe, I conclude it might be rare to see homemade versions because the sticky dough makes it a bit difficult to get the crackers as thin as store bought versions. This problem was partially remedied by chilling and rolling out the dough in small batches. I must admit that I didn't love this recipe's results. It had the familiar smell of graham crackers, that warm honey, molasses-y scent you know, but none of the mouth-feel of a true graham cracker. It wasn't grainy, but more solid like a tough cookie. I'm curious to know if the texture of the gluten-free version was truer to the original. Regardless, now that I have demystified graham crackers, I definitely think I would attempt homemade grahams again, but preferably using graham flour. Once the graham crackers were done, they were used to make graham cracker crumbs (this would have really bothered me, had I liked them enough to eat them plain). The crumbs are mixed with cocoa powder, shredded coconut, and nuts to form the bottom layer. I only had finely shredded unsweetened coconut on hand, and chose walnuts for the nuts. I intentionally left some of the graham crackers in bigger chunks rather than pulverizing the whole amount thinking it might be more interesting. Chocolate and grahams trigger thoughts of s'mores for me, and I think that was where the thought came from. P1260107.JPG

P1260111.JPG The middle layer is the custard layer. It seemed more like a frosting flavored with the popular British custard powder, Bird's. It was mostly powdered sugar, blended with butter and a bit of milk (I didn't have cream on hand). Lauren, the challenge's host, mentioned this layer was the place to add in additional flavoring. I originally intended to do a mint flavor since it was a chilled bar with chocolate. Instead, I decided to stick with the Canadian theme and use maple syrup. I added two tablespoons in the hopes of being able to distinguish the maple flavor over all the icing sugar.

The top layer was simply melted semi-sweet chocolate with a bit of butter. I added a shot of espresso that I brewed, hoping it would be a good counter-balance to all this sweetness. It's rare that I'm wary of the level of sugar in something, but these bars had me wondering if they might be an acquired taste. I do love the idea of how easily the basic formula can be adapted to different flavors. I'm also thankful I got to learn a little bit about a dessert I had never heard of. I would rather be trying one of these sweets in Vancouver, but when I make it there eventually, I'll know to look out for them. Meanwhile, I have the perfect figure-skating watching snack waiting in my freezer for when the games start.

Espresso-Maple-Walnut Nanaimo Bars I have reprinted the recipe with the few changes I made. The recipe for homemade graham crackers is below.

For the bottom layer of Nanaimo bars: 1/2 cup (115 g) (4 ounces) Unsalted Butter 1/4 cup (50 g) (1.8 ounces) Granulated Sugar 5 tablespoons (75 mL) Unsweetened Cocoa 1 Large Egg, Beaten 1 1/4 cups (300 mL) (160 g) (5.6 ounces) Graham Wafer Crumbs 1/2 cup (55 g) (1.9 ounces) Walnuts, finely chopped 1 cup (130 g) (4.5 ounces) shredded Coconut (unsweetened)

For the middle layer: 1/2 cup (115 g) (4 ounces) Unsalted Butter 2-3 tablespoons and 2 teaspoons (40 mL) whole milk 2 tablespoons real maple syrup 2 tablespoons (30 mL) Bird's Custard Powder 2 cups (254 g) (8.9 ounces) Icing Sugar

For the top layer: 4 ounces (115 g) Semi-sweet chocolate 2 tablespoons (28 g) (1 ounce) Unsalted Butter 1 shot of freshly brewed espresso

1. For bottom Layer: Melt unsalted butter, sugar and cocoa in top of a double boiler. Add egg and stir to cook and thicken. Remove from heat. Stir in graham crumbs, nuts and coconut. Press firmly into an ungreased 8 by 8 inch pan. 2. For Middle Layer: Cream butter, cream, custard powder, and icing sugar together well. Beat until light in colour. Spread over bottom layer. 3. For Top Layer: Melt chocolate and unsalted butter over low heat. Cool. Once cool, pour over middle layer and chill.

For the Graham crackers: 2 1/2 cups + 2 tablespoons all-purpose flour 1 cup (200 g) (7.1 ounces) Dark Brown Sugar, Lightly packed 1 teaspoon (5 mL) Baking soda 3/4 teaspoon (4 mL ) Kosher Salt 7 tablespoons (100 g) (3 ½ ounces) Unsalted Butter (Cut into 1-inch cubes and frozen) 1/3 cup (80 mL) Honey, Mild-flavoured such as clover. 5 tablespoons (75 mL) Whole Milk 1 tablespoons (30 mL) Pure Vanilla Extract

1. In the bowl of a food processor fitted with a steel blade, combine the flour, brown sugar, baking soda, and salt. Pulse on low to incorporate. Add the butter and pulse on and off, until the mixture is the consistency of a coarse meal. If making by hand, combine aforementioned dry ingredients with a whisk, then cut in butter until you have a coarse meal. No chunks of butter should be visible. 2. In a small bowl or liquid measuring cup, whisk together the honey, milk and vanilla. Add to the flour mixture until the dough barely comes together. It will be very soft and sticky. 3. Turn the dough onto a surface well-floured with sweet rice flour and pat the dough into a rectangle about 1 inch thick. Wrap in plastic and chill until firm, about 2 hours, or overnight. 4. Divide the dough in half and return one half to the refrigerator. Sift an even layer of sweet rice flour onto the work surface and roll the dough into a long rectangle, about 1/8 inch thick. The dough will be quite sticky, so flour as necessary. Cut into 4 by 4 inch squares. Gather the scraps together and set aside. Place wafers on one or two parchment-lined baking sheets. Chill until firm, about 30 to 45 minutes. Repeat with the second batch of dough. 5. Adjust the rack to the upper and lower positions and preheat oven to 350 degrees Fahrenheit (180 degrees Celsius). 6. Gather the scraps together into a ball, chill until firm, and reroll. Dust the surface with more flour and roll out the dough to get a couple more wafers. 7. Prick the wafers with toothpick or fork, not all the way through, in two or more rows. 8. Bake for 12 minutes, until browned and slightly firm to the touch, rotating sheets halfway through to ensure even baking. Might take less, and the starting location of each sheet may determine its required time. The ones that started on the bottom browned faster.

Gingerbread Cookie Decorating Party

PC130198.JPGI love gingerbread. It is a holiday classic. It may not be inventive or cutting-edge, but not everything should be. The recipe I follow came from Bon Appetit's December 2006 issue. It is slightly spicy, with a deep brown-sugar and molasses flavor. It puts a twist on tradition by suggesting you flavor your icing with juniper berries. This part I could take or leave. I know there are a million and one gingerbread recipes out there, and every year I say I'm going to experiment with others, but for the last three years all those who have tried them seem to love them so that I haven't found a reason to mess with a good thing. I wanted to share this recipe with you in case your looking for a well-tested classic version. PC130180.JPG I normally make these cookies at least twice during the holiday season. The first batch always seems to disappear before being wrapped up and gifted out to friends and family. The only changes I've made to the original recipe are switching out light brown sugar for dark, and using unsulphured blackstrap molasses in place of regular. It's a subtle change that make for a more intense cookie. It is the perfect cookie to practice your decorating skills on (and I learned I could use a LOT more practice) and make into a snowy weekend project. This batch was made after a wonderful holiday brunch my cousin hosted during Hanukkah. It was too cute to see four people each measuring out different ingredients and generally buzzing around the table. mosaic62cb9d129a8a15fe6a2da6004ae037425bbca69e mosaic05fb6e7b331d4d03440f57c3877176aaa71cd18b After the dough rested, we set up two separate rolling stations (photos at this point were getting a bit blurry after a few mimosas) and went to work lining up the cut out shapes on silpat or parchment-lined baking sheets. This would be perfect work for little kids, but the only kid we had on hand was still too little to help. Not that any of us big kids seemed to mind handling the task. These cookies bake up crisp, and the thinner you roll them out the crisper they will be. We went with about 1/4 inch thickness on the dough to have them be a bit more chewy. They also need to be carefully watched towards the end of the baking time, unless you don't mind them a bit well-done around the edges (I save those imperfect ones for myself). PC130194.JPG Once they're baked, let them cool and prepare the royal icing to decorate as you wish. That's when the real fun comes in. This time around we skipped the juniper flavor used in the original recipe (of course if you want to give the juniper a try, find it here). We used lime juice in place of lemon juice for the royal icing, simply because we were out of lemons. But we all agreed the lime was a nice little twist that we would make again. We used Martha Stewart's royal icing recipe, and it was a very good thing.

Gingerbread Cookies Adapted from Bon Appetit. See links above for two different icing options.

2 1/4 cups unbleached all purpose flour 1 teaspoon ground ginger 1 teaspoon ground allspice 1/2 teaspoon ground cinnamon 1/2 teaspoon baking soda 1/2 teaspoon salt 1 cup (2 sticks) unsalted butter, room temperature 1/2 cup (packed) dark brown sugar 1/4 cup blackstrap molasses

Whisk first 6 ingredients in medium bowl. Beat butter and sugar in large bowl until fluffy. Beat in molasses. Beat in dry ingredients. Gather dough; divide into 4 pieces. Shape into disks. Wrap; chill at least 2 hours and up to 2 days.

Preheat oven to 350°F. Line 2 baking sheets with parchment. Roll out 1 dough disk to 1/8-inch thickness. Using 3 1/2-inch cutter, cut out cookies. Transfer to sheet. Gather scraps; chill.

Bake cookies until almost firm in center, 12 minutes. Cool on sheets 2 minutes, then cool on racks. Repeat, using all dough.

Note: Cookies can be stored in an airtight container at room temperature up to 3 days or freeze up to 2 weeks.

Holiday Lace Cookies

PC160250.JPG You know these cookies. You've seen them in the cookies by the pound section of the bakery case. You've even eaten them before and loved them, most likely without knowing their name. They're an old-fashioned cookie, generally known as Lace Cookies because of their porous looking appearance. It appears there are lace cookie variations from one European country to another (like most cookies). French lace cookies were traditionally made with almonds, while Irish lace cookies were made with oatmeal and milk or cream, and German lace cookies are also oatmeal-based cookies, but with ginger, cloves and cinnamon added. My recipe came from the Fannie Farmer Cookbook, originally written to help bring some consistency to our young country, by creating recipes that were formulas. Fannie (as I like to call her) Americanized things in the process by removing any country of origin, and simply called them Lace Cookies. Additionally, many newer American versions today call for corn syrup, but I prefer to bake with butter when I can.

PC160213.JPG

I'm entering this into the Share Our Strength, 12 Days of Sharing cookie jar. (A great cause, read more about it at In Jennie's Kitchen).This cookie recipe should be categorized under, Stupidly Simple, because it is. Mix dry ingredients in a bowl. Pour melted butter over it, then a beaten egg and some vanilla. Drop onto a cookie sheet and bake. Nothing more too it. It's the kind of recipe you'd be well-served committing to memory to whip up off the top of your head while visiting family, or away for the weekend skiing. The results would impress your onlookers and fool everyone into thinking your a culinary whiz in the kitchen. Sit back, smile, and think, "Ha, ha."

There's only a few tricks to know how to pull this recipe off without a hitch. First, you must must space the cookies at least 1 1/2 inches to 2 inches apart, depending on the size of your cookies. Second, you should stay close to the oven while these babies are baking. They go from well-done to slightly burnt quickly. My suggestion is to keep the oven light on (if you have one) and keep an eye on them after they've been in there for 3 minutes. Plus, it's fun to watch the cookies bubble away and bake. Third, you really must use some patience and give them a few minutes to cool before you try to move them off the cookie sheet. If you slide your spatula under one while it is still hot it will squish into the middle and resemble a piece of caramel. That is an irreversible error. Obviously it will still taste good, but baked goods should also look good too.

mosaic12198e095cd8ebebc96159ac667b67bc5cd6a1fe

mosaice19e9f8404f44b4fbc21594743037eefd1237261

This being a holiday cookie, you should consider some options to gussy up your cookie creation. Consider shaping the cookies into a tuille by bending them around the handle of a wooden spoon while still warm (not hot). Then let them cool in that shape. This is a pretty example of how a tuille shape makes a more impressive presentation. My personal favorite is the way I had them as a kid, where the bottom is coated with melted chocolate. Yum. And, coating things with chocolate seems like a good task to include the kiddies in on. (Personally, I wish someone had let me do that as a kid, rather than play with a dreidel. I'm just saying.)

PC160245.JPG

Holiday Lace Cookies Adapted from The Fannie Farmer Cookbook

1 1/2 cups uncooked oatmeal (not anything instant or quick-cooking) 1 1/4 cups brown sugar 2 tablespoons flour 1/2 teaspoon salt 2/3 cup (about 10 tablespoons) melted butter 1 egg, lightly beaten 1/2 teaspoon vanilla

Preheat the oven to 350 degrees Fahrenheit.

Mix the dry ingredients together in a big bowl. Melt the butter. Add to the dry ingredients and mix to combine. Add the egg and the vanilla and mix until all incorporated.

Line a baking sheet with a silpat or parchment paper. Drop cookies about 1/2-1 teaspoon at a time onto cooking sheet. Take care to keep them spaced about 2 inches apart. They will look small but will spread as they bake. Bake in the oven for 5 minutes or until firm. Watch them closely after 3 minutes, depending on how well done you want them. Let cookies cool on the baking sheet for a few minutes before you touch them. Carefully, using a spatula lift off baking sheet to cool completely.

12DaysCookies_badge-1

Testing-New-Thanksgiving-Desserts-Fig-Crostata

PB140051.JPG I'm a sucker for a pretty package, so when I saw the photo of the crumbly, flaky, lattice-topped fig crostata in November's Gourmet magazine, I instantly wanted to make it. I thought finding a new option for the dessert table on Thanksgiving could be a good idea. Then I remembered I come from a family of non-adventurous eaters, and die-hard traditionalists. It's apple or pumpkin or nothing. I figured that should not hold me back. I could bake this a week early, and find out for myself if it was as delicious tasting as it was attractive. Maybe it would be worth trying to convince my dining companions this Thanksgiving to give something new a try.

PB140029.<span class=

A crostata is an Italian form of pie made of a shortcake cookie-type of dough. It has as many variations and the internet is filled with recipes where a crostata dough is used as a free-form crust where the sides are folded around the filing, similar to a French galette.

PB140041.<span class=

This recipe is made in a springform pan, where the crumbly dough is rolled out and simply pressed into the pan and up the sides. That's easy enough. The lattice-top is a bit more involved. I'll admit anytime I've tried to make a lattice-topped pie crust it ends with a lot of cursing and frustration as my strips soften and fall apart as I try to place them on top. Inevitably I often throw my hands up in defeat and roll the whole mess into one big ball and try for a normal pie crust. But, I finally have figured out that the freezer is my friend and I can fix this problem by popping the strips into the freezer to flash chill if they get difficult to work with. This trick saved the day and made the intricate, impressive looking top easy enough for even novice bakers.

PB140045.<span class=

The filling smelled incredible while cooking and filled the kitchen with those warm spice aromas that we associate with the holidays. I'm sad to say that when it was all pureed and baked it tasted like an orange flavored fig newton. It was tasty, but the similarity to a fig cookie made it not that desirable as a holiday dessert. On the other hand, it also made it seem healthier than a pie and I ate it for breakfast today.

My official taste-test verdict? If you're a fig enthusiast, this pie is worth a try. But be prepared for the harsh reality that like me, you find that you are more like your family than you care to admit, and realize that it ain't turkey day without a pumpkin pie.

PB140060.<span class=

Fig Crostata Recipe from Gourmet Magazine, November 2009

For Pastry Dough 2 cups all-purpose flour 1/4 cup granulated sugar 1/2 tsp salt 1 1/2 sticks cold unsalted butter, cut into 1/2-inch cubes 2 large egg yolks 1 tsp vanilla extract 1 Tbsp cold water

For Fig Filling 12 oz soft dried figs, stemmed and coarsely chopped 1 1/4 cups water 1 cup fresh orange juice 1/2 cup packed dark brown sugar 1 stick unsalted butter, melted and cooled 3 large eggs, lightly beaten 1 tsp vanilla extract 1 tsp grated orange zest 1 1/2 cups walnuts, coarsely chopped

To make the dough: Blend together flour, sugar, salt and butter in a food processor just until mixture resembles coarse meal with some roughly pea-size butter lumps (alternatively do this in a bowl with your fingers). Add yolks, vanilla and water and pulse until incorporated and dough begins to form large clumps. Turn dough onto a lightly floured surface and divide into 4 portions. With heel of your hand, smear each portion once or twice in a forward motion to help distribute fat. Gather all dough together then divide dough in half and form each half into a 5-6 inch disk. Chill, wrapped in plastic warp, until firm at least 1 hour, or up to 3 days.

To make filling: Simmer figs, water, orange juice, and brown sugar in a medium saucepan, covered, stirring occasionally, until figs are soft and mixture is reduced to about 2 cups, 15 to 20 minutes. Pulse in a food processor until finely chopped (mixture should not be smooth). Transfer to a large bowl and cool slightly. Stir in butter, eggs, vanilla, zest and walnuts.

To make tart shell: Butter a 9-inch springform pan. Roll out 1 portion of dough between 2 sheets of parchment paper into a 12-inch round (dough will be soft; chill or freeze briefly if it becomes difficult to work with). Peel off top sheet of parchment and carefully invert dough into pan. (Dough will tear easily but can be patched together with your fingers). Press dough onto bottom and 1 inch up side of pan, then trim excess. Chill tart shell until ready to assemble.

Roll out remaining dough between parchment into 12-inch round. Peel off top sheet of parchment, then cut dough into 10 (1-inch wide) strips and slide (still on parchment) onto a tray. Chill until firm, about 10 minutes.

Assemble crostata: Spread fig filling in shell. Arrange 5 strips of dough 1 inch apart on filling. Arrange remaining 5 strips 1 inch apart across first strips to form a lattice. Trim edges of strips flush with edge of shell. Sprinkle top with sugar.

Preheat oven to 350 degrees Fahrenheit. Bake until filling is slightly puffed and pastry is pale golden, about 30 minutes. Cool completely, then remove side of pan. Gourmet suggests you serve crostata with mascarpone.

Peach and Blackberry Cobbler

I finally found some time to bake for Dessert Corps again this week. I really do love doing it, even if it's very hard not to take a taste of the finished product. I'm also considering this post as my contribution for Fight Back Fridays, because allowing the soup kitchen to serve homemade desserts rather than the food "product" alternatives is food justice in action. Sometimes I think about doing a quality control, but in the end self-control kicks in and I choose not to hand over a dish with a piece missing, but boy oh boy it was hard this week. P8050185.JPG The local CSAs donate some of their extra fruit during the summer months to the soup kitchen, so I didn't pick my fruit, it picked me. I kind of like the surprise element to it all. This week they had some extra doughnut peaches (also known as Saturn peaches or pan tao peaches) and blackberries. Doughnut peaches are a very sweet heirloom variety of a peach that are delicious. They are also less acidic than the larger more common variety of peaches. I set out to think about what to do with these star ingredients. I love the combo of blackberries and cornmeal but wanted to make a one-dish dessert that would be easy to serve, so that ruled out making a blackberry sauce. I also wanted to utilize all the fruit so it didn't go to waste. I was leaning towards a cobbler but I wasn't super excited about it. Then I found a recipe for a cobbler that incorporated cornmeal into the biscuit topping. Indecision ended there. Blackberries and cornmeal baked goods (think pancakes) are a natural pairing. That matched with the sweetness of the peaches would be excellent. Cobblers are a pretty simple dessert to make and don't require any stand mixers or fancy equipment. I have always loved old-fashioned American style desserts despite their humble techniques and plain Jane appearances. There is something so comforting to me about being able to whip up a dessert with not more than a bowl and a wooden spoon (dream bubble pops above my head to my creepy 1950's sitcom fantasy of me and one of those frilly half-aprons setting out a pie to cool in my window). Back to reality and East Williamsburg. Regardless, a cobbler dough is a cinch to put together all in one bowl. It is a type of biscuit dough and as soon as you mix the wet ingredients into the dry ones you can smell that doughy goodness. Set that aside while you prep the fruit. Peel and dice your fruit, peaches in this case, and mix in a pot with a thickening agent, in this case cornstarch and some sort of sugar, a bit of lemon juice, cinnamon and a pinch of salt. Mix together and let cook for a mere five minutes. You're fruit mixture will be transformed what looks like and smells like the inside of a slice of warm pie. Yum. I think I might consider using less sugar next time, because I was concerned that the amount used in this recipe might mask the natural flavor of the peaches. But, being that this recipe was Southern in origin, I just went with it.

After the peaches are cooked all that is left is to assemble the cobbler. Mix the berries into the peach mixture, very carefully. Then pour into a greased baking dish (note the one in the photo is obviously too large, but I couldn't find a smaller disposable size to bring to the soup kitchen) and drop tablespoons of the biscuit dough all over the top of the fruit mixture. Maybe it's just because I didn't actually get to have a dish for myself but I can still smell how delicious it was, a mix of aromas of warm peach pie and freshly baked biscuits. Incredible, really. I just hope that it the diners thought it tasted as good as I thought it smelled.

Peach and Blackberry Cobbler Adapted from Epicurious and Down Home with the Neelys. Try this in winter time too with whatever is in season (apples, pears).

For the Biscuit Dough: 2 cups all-purpose flour 1/4 cup cornmeal 1/4 cup sugar 1 tablespoon baking powder 1/2 teaspoon salt 5 tablespoons cold unsalted butter 1 cup whole milk 1 large egg, lightly beaten

For the Filling: 2 pounds fresh peaches, peeled, pitted, and sliced 1 cup brown sugar 2 teaspoons lemon juice 2 tablespoons cornstarch 1/2 teaspoon ground cinnamon Pinch salt 1 teaspoon pure vanilla extract 2 pints fresh blackberries

To make the biscuit dough - whisk together the flour, cornmeal, 1/4 cup sugar, baking powder, and salt. Cut in the butter until the mixture resembles coarse crumbs (using your hands works well). Using a fork, stir in the milk and egg just to combine.

Preheat the oven to 350°F. Generously butter a 7 × 11-inch baking dish.

To make the filling - take your prepped peaches and place in a saucepan with the brown sugar, lemon juice, cornstarch, cinnamon, and pinch of salt over medium-high heat. Bring the peaches to a boil, stirring frequently (this is an important step otherwise you'll have caramel). Reduce the heat to medium- low and simmer, stirring, until the sauce thickens and the peaches have softened, about 3 minutes. Remove from the heat, and stir in the vanilla and blackberries. Transfer the filling to the baking dish.

To assemble - use 2 tablespoons, one to scoop up batter and the other spoon to push it off the spoon onto the fruit mixture. Drop spoon fulls of batter to cover the fruit evenly. Sprinkle the tops of the biscuits with some granulated sugar, and bake for 25 to 30 minutes, or until the biscuits are golden brown and the filling is bubbly and thick around the edges.

Cool for 10 minutes. Would be great served warm with ice cream.

Apricot Clafouti pour moi

Apricots are a gamble. They look to me to be a tiny, tasty smaller cousin of a peach. When I saw them in the farmer's market on Saturday, I assumed they would be as sweet as the fruit they were sharing the table with, cherries and plums. But, as Nigel Slater wrote about apricots in The Kitchen Diaries, "their eating quality depends more on luck than good judgement." Although this statement made me feel a bit better about my purchase, I still had a basket of gorgeous, but very tart, fruit on my hands. Personally, in the summer when fruit is as juicy as it is right now, I hesitate to bake it into anything. Sweet fruit is a dessert all on its own. Sunday night was a different story. I wasn't going to let my apricots go to waste. I took Nigel's advice and decided to "tease out their flavor with warmth" (why paraphrase when he says it better than I could?). I decided to go with a classic French dessert, the clafouti. Clafoutis are traditionally made with cherries, but many different types of fruit would work well. For instance, Julia Child gives different variations using plums, pears or blackberries (although she didn't mention apricots, maybe it is not traditional). I took my recipe from the San Francisco Chronicle cookbook (my favorite favorite cookbook of all time). It is essentially a pancake-type of batter poured over fruit. Some variations (I checked quite a few) use more cream than others and some seem more custard-y than others. Regardless, this was my first clafouti, so I guess I have plenty of room to try others. It did remind me of a Dutch-pancake, something I used to make for brunch sometimes, which is also a batter poured over fruit that puffs up as it bakes, and deflates quickly as it cools. I think in the end my clafouti was satisfying, although the apricots were still quite tart even after baking. The batter was lighter than a cake, but more egg-y tasting than a pancake. If I replicated this dish, I think the apricots could benefit from marinating in some kirsh and sugar, a Julia Child suggestion from Mastering the Art of French Cooking. I'll admit I probably should have had another basket of apricots to place in the cake to sufficiently cover the pan. But, then again, sometimes home cooking is about making due with what you have, and I only had one basket of apricots. Looking at the positives - I liked that it wasn't as heavy as a cobbler would have been, had I done that instead. I even think the leftovers could make an acceptable breakfast, and what's better than dessert for breakfast?

Fresh Apricot Clafouti Adapted from a recipe by Georgeanne Brennan in The San Francisco Chronicle Cookbook. I noted where I substituted ingredients, but if I set out to bake this again, it would be preferable to have the full-fat dairy ingredients.

1 cup milk (I used reduced-fat only cause that's all I had) 1/4 cup heavy cream (I used light cream) 1/4 cup brown sugar 3 eggs 1 tablespoon almond extract (I used vanilla) 1/8 teaspoon salt 2/3 cup all-purpose flour apricots, halved and pitted (enough to cover most of the pan)

Preheat the oven to 350 degrees Fahrenheit. Butter a deep baking dish. Combine all the ingredients, except for the apricots in a mixing bowl and beat with an electric mixer until frothy. (Alternatively, mix all the ingredients in a blender if you prefer).

Pour just enough batter into the pan to cover the bottom with a layer about 1/4 inch deep. Put the pan into the oven for 2-5 minutes, or until just set.

Remove pan from the oven and arrange apricots face down evenly around the pan. Pour the remaining batter over the apricots. Bake until puffed and brown, about 30-35 minutes. It is done if a knife inserted in the center comes out clean.

Serve warm and sprinkle with powdered sugar.

Easy-as-a-Summer-Day Cape Cod Cookies

It's a gorgeous summer weekend, the kind that really makes me wish I had a summer house (or more friends with summer houses). It's the type of weather that makes you wish you had planned a bit better in the winter to have some time set aside for a roadtrip to places that seem made for summer. Cape Cod is one of those special places, and it seems appropo that the cookies I made this week were inspired by its simple pleasures. These are the easiest, tastiest oatmeal cookies I know of. I baked these for my bi-monthly Dessert Corp contribution. (For more on Dessert Corp, see my earlier post on this great organization). They are the epitome of an easy dessert - no creaming the butter and sugar, and no special equipment is needed. Just you, your wooden spoon, and a big bowl.

This recipe comes from the Fannie Farmer Cookbook. This book has been sort of a cooking bible in my family. I have learned so much from this book, and still refer to it at times for information (although the Internet has been winning out lately - shhh!). These days I mostly use it for the baking recipes, as my culinary tastes have gotten a bit more exotic, but it is still an amazing reference book. Marion Cunningham included not 1, but 3 separate oatmeal cookie recipes in this book. I chose her Cape Cod version, only because the other recipe called for shortening, which is something I don't keep around and don't prefer to bake with.

I can tell you these cookies won't disappoint. They deliver a deeper, richer flavor than most oatmeal cookies I've tried, thanks to the addition of molasses. They are sweet and spicy, and warm and soft, the way the fresh-baked cookies of my dreams are. They are exactly the kind of cookie I imagine some storybook mom would serve up with a glass of milk to her kids after-school. Although, the feeling is just as nice for us grown-up kids when you bake a batch for yourself.

Easy-as-a-Summer-Day Cape Cod Cookies Adapted from The Fannie Farmer Cookbook. (These cookies work great frozen, so if you don't want to eat the whole batch, just spoon them out onto a cookie sheet, but instead of baking, place in the freezer until frozen, about an hour, and then store in a freezer-safe plastic bag. When ready to use, you can place them directly into the oven from the freezer, just increase the cooking time by 5 minutes.)

1 1/2 cups all-purpose flour 1/2 teaspoon baking soda 1 teaspoon cinammon 1/2 teaspoon salt 1 egg, lightly beaten 1 cup sugar 1/2 cup melted butter 1 tablespoon molasses (I use Blackstrap Molasses, which has a sweeter flavor than regular, if you can find it) 1/4 cup milk (reduced fat works in a pinch) 1 3/4 cup oatmeal 1/2 raisins (optional, dried cranberries would be nice too) 1/2 cup chopped nuts (optional)

Preheat oven to 350 degrees Fahrenheit. Whisk the flour, baking soda, cinammon, and salt together in a large bowl. Add the rest of the ingredients all at once (it'll work, don't worry) and stir together until everything is evenly incorporated.

Drop teaspoon sized cookies on a baking sheet. You may want to press them down a bit with the back of your spoon, as this batter doesn't spread much. Bake until edges look brown and cookies don't appear too gooey, about 10-12 minutes. Cool on a wire rack.

Better-than-Before-Brownies

So, I found a wonderful reason to bake (cause I always want an excuse to bake) without feeling guilty about making large quantities of dessert for myself. A few really clever people who help run The Greenpoint Soup Kitchen thought up a way to include home-baked desserts on their menu, and in the process get more volunteers involved at the soup kitchen who wouldn't otherwise have had the time to help out. Thus, Dessert Corps was born, a team of volunteers who regularly sign-up to bake the assigned dessert for the week, when they have the time. This concept is really great for baking addicts like me who want a reason to indulge their crazy need to bake, and do something good for the community in the process. A win-win situation. I really hope that other soup kitchens around the city implement similar projects. There are so many baking fiends out there that, it shouldn't be hard to find volunteers in most neighborhoods. For more info, check out their blog: http://craigskitchen.wordpress.com Back to the oven...this week I signed up for brownies.

In the past, I have steered clear of making brownies for others, having always failed to find a recipe that seemed to deliver the type of fudgey-chocolately brownie I wanted. I've tried recipes with a twist (adding coffee or banana) that all seemed intriguing, but the classic is what I wanted to master. I've tried recipes that utilized different types of chocolate, such as bittersweet, unsweetened, or cocoa powder, but there was never a clear winner (except maybe a clear loser, cocoa powder). I've also tried recipes that required an obscene amount of expensive chocolate, thinking that would surely be a winner for a chocoholic like myself, but the results weren't worth the expense. Why was it so difficult? Then I read an article from Cook's Illustrated, where an in-depth analysis of what was needed to concoct the perfect brownie was undertaken. Of course, I had to test their theory. Their attention to detail may have paid off in coming one step closer to perfection. I've tested their method three separate times so far. I've varied the brand of chocolate and the amount of sugar. The first time I made it, I pretty much followed the recipe verbatim, and used a higher quality chocolate. They came out super fudgey, almost gooey (possibly from being slightly under cooked) and a tad bit too sweet for my taste. I'm talking possible sugar shock sweet. Still, to my surprise people at work went gaga for them. I was flattered...but I was still not satisfied. I'm a perfectionist when it comes to my sweets. I promised my office taste-testers a few needed tweeks and another batch. Round-two, I used a smaller pan (8-inch, rather than the 13x9 inch) to have a higher brownie. I also decreased the amount of sugar by a bit and made sure not to under cook them. I thought they looked much better, although they received a much more lackluster reaction. Hmmm...stumped. Still through all this, this recipe is the closest I've ever come to a batch of brownies I can proudly offer up, even if the voice inside my head still thinks they're not perfect. This is one of those things I think I'll always be wondering what else is out there...but until I find it, these will do nicely.

Better-than-Before-Brownies Adapted from Cook's Illustrated The original recipe calls for cake flour, which should lead to a more delicate texture. I have read that cake flour is treated with chlorine, so I prefer not to use it. A quick substitution is 1 cup AP Flour minus 2 tablespoons.

1 1/4 cup unbleached all-purpose flour 1/2 teaspoon salt 3/4 teaspoon baking powder 6 oz. unsweetened chocolate 12 tablespoons unsalted butter 2 cups sugar 4 large eggs 1 tablespoon vanilla extract

Preheat oven to 325 degree Fahrenheit and take a 13x9x2 inch pan. Take parchment paper (or foil) and place on the inside of the pan with an overhang on both sides. Do

two pieces one going the length and the other going the width of the pan. This will help lift the brownies out of the pan. (If using foil, remember to butter or spray it to prevent sticking).

Whisk together the flour, salt, and baking powder. Set aside.

Set up a large bowl over a pot of boiling water (or use your double-boiler) and place the butter and chocolate in to melt. Keep an eye on it and stir frequently to prevent burning. When mixture is completely melted, whisk in sugar slowly. Next, whisk in eggs, one at a time. Then whisk in vanilla. Fold in flour mixture in three additions, folding and blending until batter is smooth.

Pour batter into pan and spread into corners and smooth out the surface. Bake for 30-35 minutes, or until a toothpick comes out almost clean (just a few crumbs is perfect). Cool on a rack until completely to room temperature. Then lift brownies out of pan and cut into pieces. Note - If you try to cut them to soon they will be a mess and the insides will stick to your knife. Patience Grasshopper.